Preisgünstiger Drehknopf Anzeige aus Team Source Display
In diesem Artikel beschäftigen wir uns eingehender mit der Erstellung eines 2D-Karussells. Durch die Erstellung mehrerer funktionaler Seiten und das Schreiben einer einfachen Switch-Anweisung in der Menüoberfläche nutzen wir die Aktionen, Interaktionen und benutzerdefinierten Funktionen von TouchGFX, um mit minimalem Codeaufwand ein sekundäres Menü zu konstruieren.
TouchGFX-Aktionsgrundlagen
Referenzlink: https://support.touchgfx.com/docs/development/ui-development/touchgfx-engine-features/custom-triggers-and-actions#custom-actions Kurz gesagt: Wenn Sie eine Interaktion im Code auslösen möchten, können Sie eine Aktion dafür erstellen. Eine Aktion kann sowohl Auslöser einer Interaktion sein als auch von einer Interaktion ausgelöst werden.
In diesem Projekt nutzen wir die Aktion als Auslöser für die Interaktion und machen sie so im Code auslösbar. Anschließend leiten wir das Auslösesignal an die TouchGFX-Basis weiter, wodurch die Bildschirmumschaltung ausgelöst wird und somit indirekt eine im Code gesteuerte Bildschirmumschaltung realisiert wird.
Nehmen wir zunächst das vorherige Projekt:
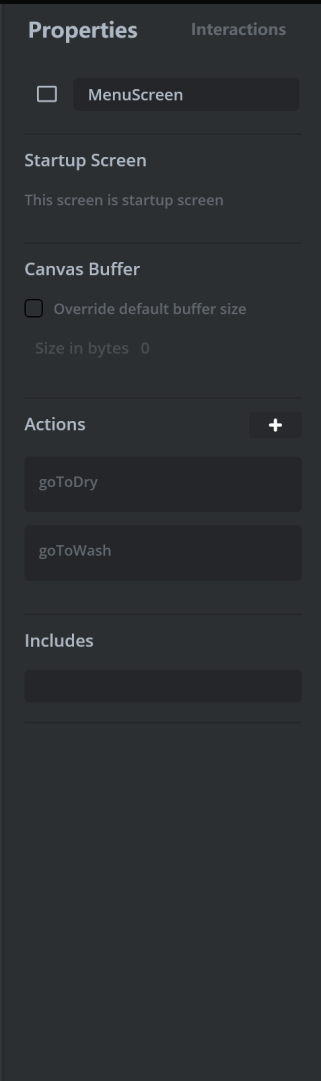
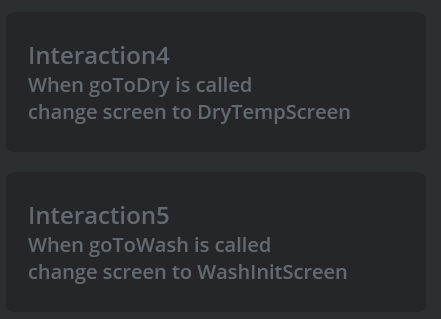
Erstellen Sie zwei Aktionen in der Menüoberfläche, die den beiden von uns entworfenen Menüelementen entsprechen. Wechseln Sie anschließend zum Reiter „Interaktion“ auf der rechten Seite und erstellen Sie eine Interaktion, die die beiden Bildschirmwechselelemente verbindet (die Funktionsseiten müssen zuvor erstellt werden).
An diesem Punkt haben wir die Erstellung des Schnittstellenteils auf Basis von Aktionen und Interaktionen abgeschlossen.
Positionierung von Karussell-Elementen und API-Integration
Bei der Interaktion mit einem Menü-Steuerelement muss das Menü selbst wissen, welches Element ausgewählt ist, damit durch Anklicken anhand der in der Benutzeroberfläche angezeigten Bezeichnung die entsprechende Seite ermittelt werden kann. Dies muss vor dem Aufruf der von uns entwickelten API geklärt werden.
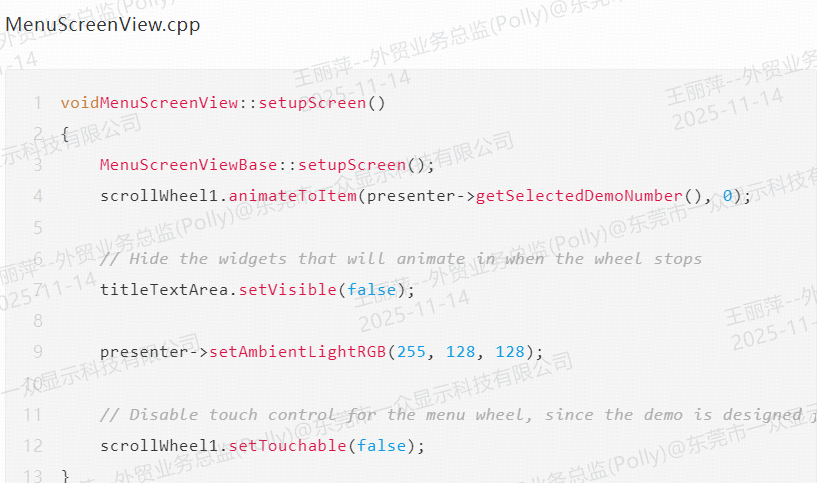
In TouchGFX ist im Menü-Steuerelement bereits die Funktion `scrollWheel1.getSelectedItem()` integriert, die speziell zum Abrufen des ausgewählten Elements dient. Diese Daten müssen jedoch anderen Dateien in der Anwendungsschicht zugewiesen werden, damit das Programm erkennt, welche Unterdemo ausgewählt ist.
Deshalb verwenden wir `Model.cpp`, wo wir die Funktionalität für den Datentransfer hinzufügen.
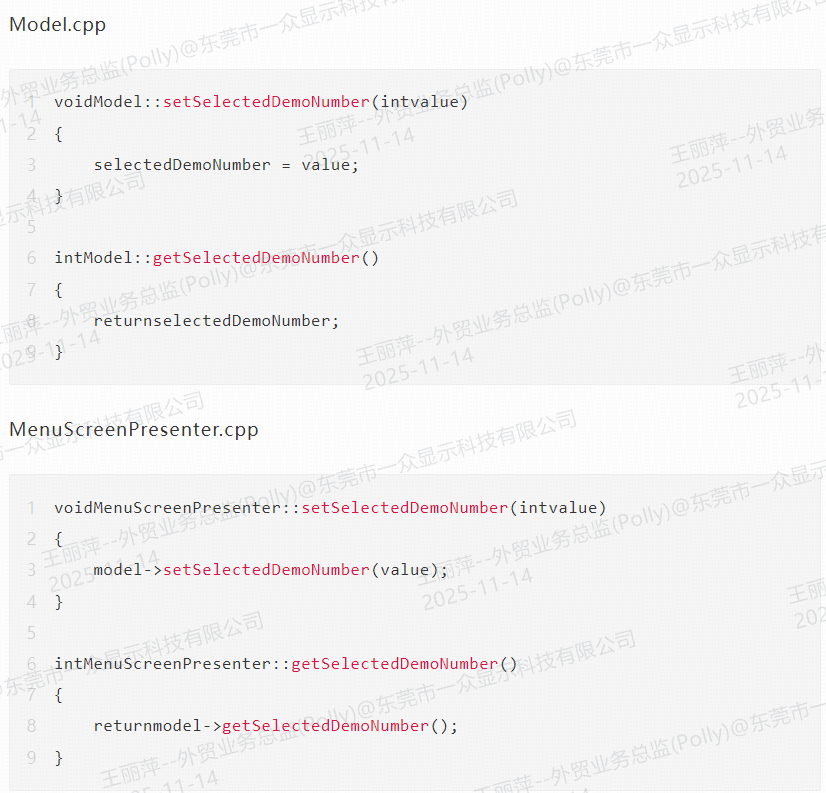
Dadurch wird das ScrollWheel-Menü erfolgreich mit unserer Anwendung verbunden.
Wie binden wir also die übertragenen Daten in unsere API ein? Im Prinzip rufen wir unsere Aktion direkt als Funktion auf. Der Einfachheit halber haben wir das ausgewählte Element als „DemoNumber“ übertragen, sodass wir direkt eine Switch-Anweisung mit mehreren Case-Anweisungen schreiben können, um die entsprechende Bildschirmumschaltfunktion aufzurufen. Dies setzt grundlegende C-Kenntnisse voraus.

Wie Sie sehen können, ist die TouchGFX-Bibliothek sehr umfangreich, sodass wir tatsächlich nicht viel Code schreiben müssen, um die Funktionalität zu implementieren.
Kompilieren, flashen und die Ergebnisse ansehen. Klicken Sie auf den unten stehenden Link, um weitere Informationen zur Leistungsfähigkeit unseres Drehknopf-Anzeigemoduls zu erhalten:
https://www.youtube.com/watch?v=WnhW_CznyXY


 E-Mail : info@tslcd.com
 Tel : +86-755-28225963